
In Part 02, we covered how services find each other and communicate internally. That’s the East-West side of the system — hidden from the outside world.
But what about the outside world? A user opens your app. A mobile client makes a request. That request needs to get in. And it needs to reach the right service, in a reliable way.
That’s the North-South traffic. And the component responsible for handling it is the API Gateway.
What is an API Gateway?
Think of it as the front door of your system.
Every request coming from outside goes through it. The gateway decides where to send it, how to protect the services behind it, and what to do when something goes wrong.
Without it, clients would need to know the address of every individual service. Add a new service, change a port, scale an instance: clients break. The gateway removes that dependency completely.
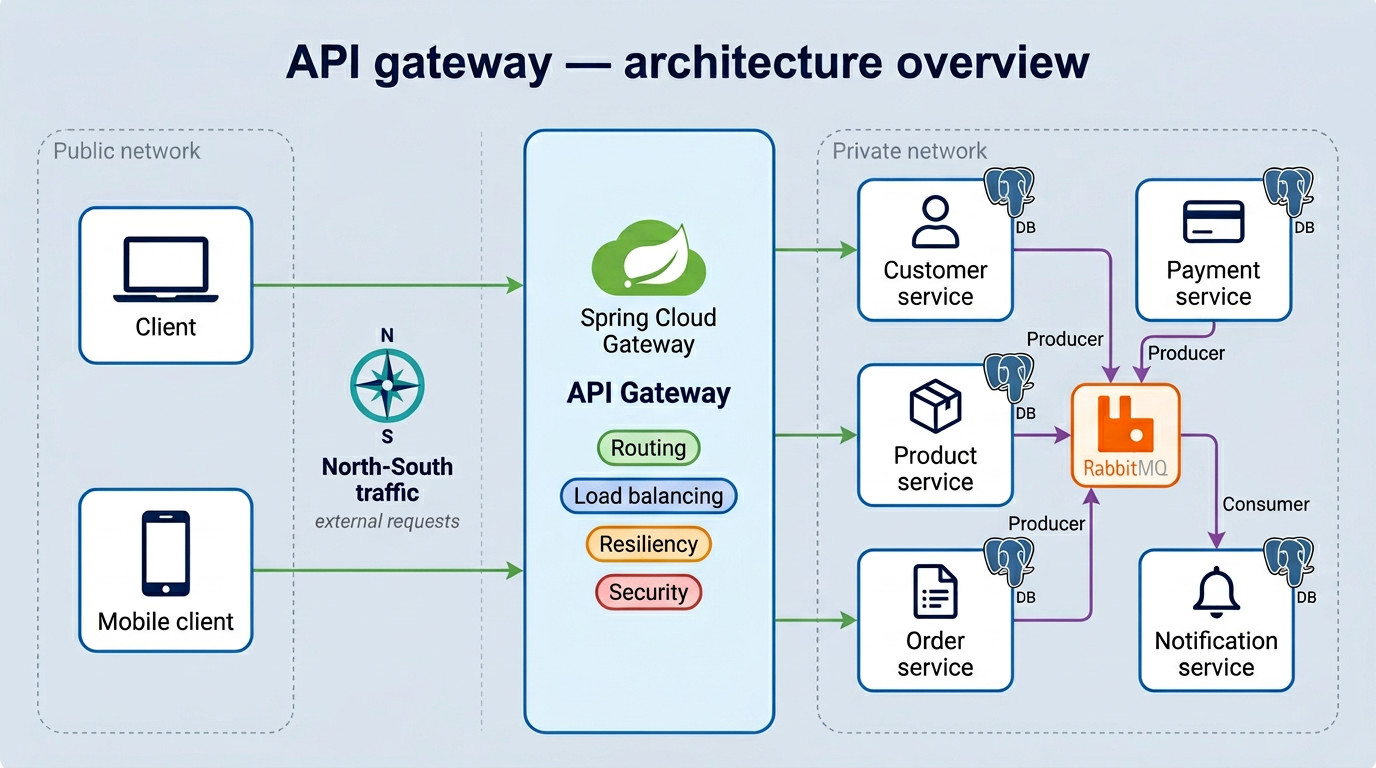
In our project, we use Spring Cloud Gateway. Here’s what it handles:
- Routing — sending each request to the right service
- Load Balancing — distributing traffic when a service has multiple instances
- Resiliency — protecting services when things go wrong
- Security — authentication, API key validation, OAuth2 (covered in Part 04)
Let’s go through the first three in this article.
Routing
Routing is the most basic job of the gateway. A request comes in with a path, and the gateway maps it to a service.
In Spring Cloud Gateway, this is done through route configuration:
spring:
  cloud:
    gateway:
      routes:
        - id: customer
          uri: lb://CUSTOMER
          predicates:
            - Path=/api/v1/customers/**
        - id: product
          uri: lb://PRODUCT
          predicates:
            - Path=/api/v1/products/**
        - id: order
          uri: lb://ORDER
          predicates:
            - Path=/api/v1/orders/**
        - id: payment
          uri: lb://PAYMENT
          predicates:
            - Path=/api/v1/payments/**
        - id: notification
          uri: lb://NOTIFICATION
          ...
Each route has:
- an id to identify it
- a uri pointing to the target service. The
lb://prefix tells the gateway to use load balancing when forwarding the request. We’ll see exactly how that works in the next section. - a predicate that matches the incoming request, in this case the URL path
A request to /api/v1/orders/** goes to the Order service. Simple as that.
The gateway entry point is a plain Spring Boot app with one annotation:
@SpringBootApplication
@EnableDiscoveryClient
public class GatewayApplication {
    public static void main(String[] args) {
        SpringApplication.run(GatewayApplication.class, args);
    }
}
@EnableDiscoveryClient connects it to Eureka, so the gateway can resolve lb://ORDER to the actual Order service address dynamically.
Load Balancing
You probably noticed lb:// in the route URIs. That prefix is what enables load balancing. But before we talk about how it works, let’s look at why you need it in the first place.
The Problem: One instance isn’t enough
On a normal day, your Order service is running fine on a single instance, handling roughly 1,000 requests per minute. Everything looks good.
Then the business team decides to launch Black Friday promotions with massive discounts. Suddenly, 100,000+ users hit the platform at the same time.
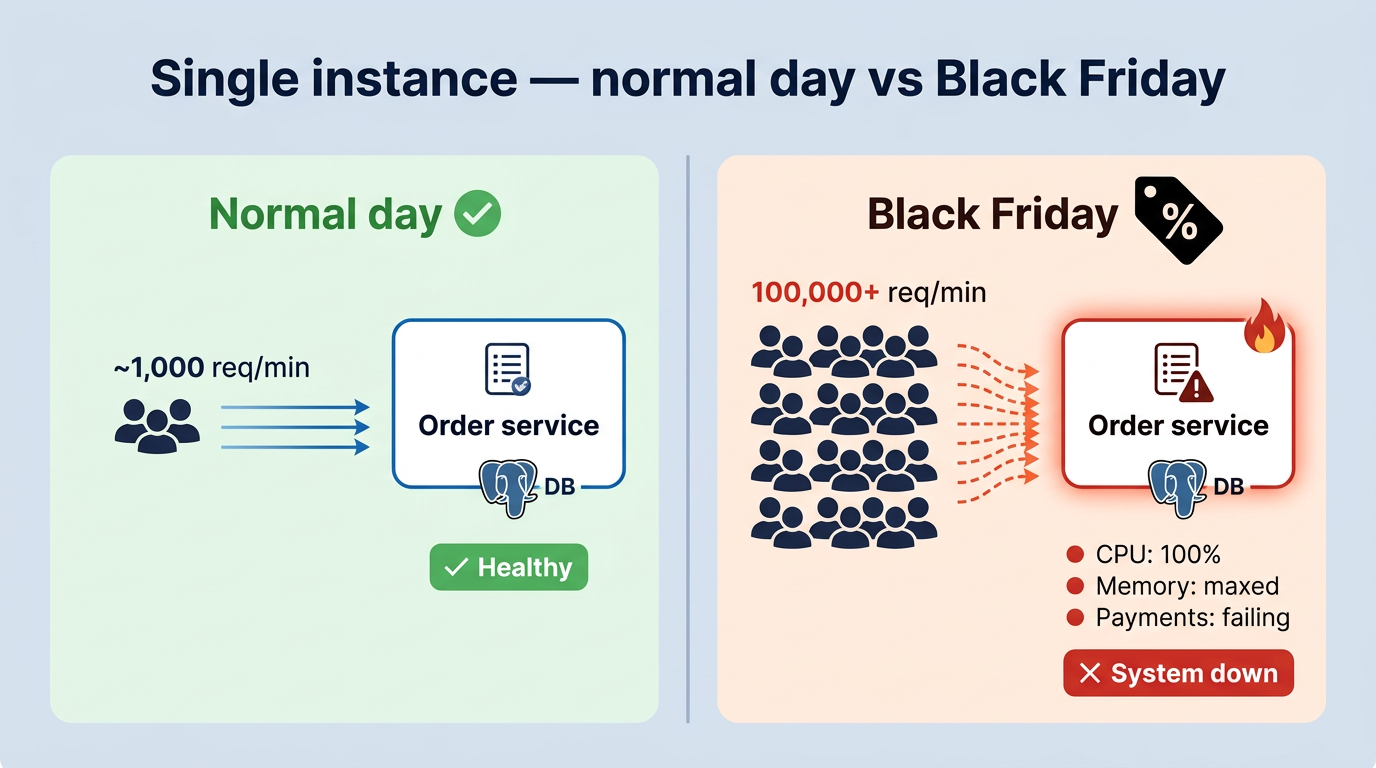
That single instance was never built for this kind of load. CPU hits 100%, memory is maxed out, database connections are saturated. Payments stop going through. The whole service becomes unresponsive.
Vertical Scaling: Just add more resources?
The first reaction is usually: “Let’s just upgrade the server.” More CPU, more RAM. That’s called vertical scaling.
It helps for a while. But it has two big problems:
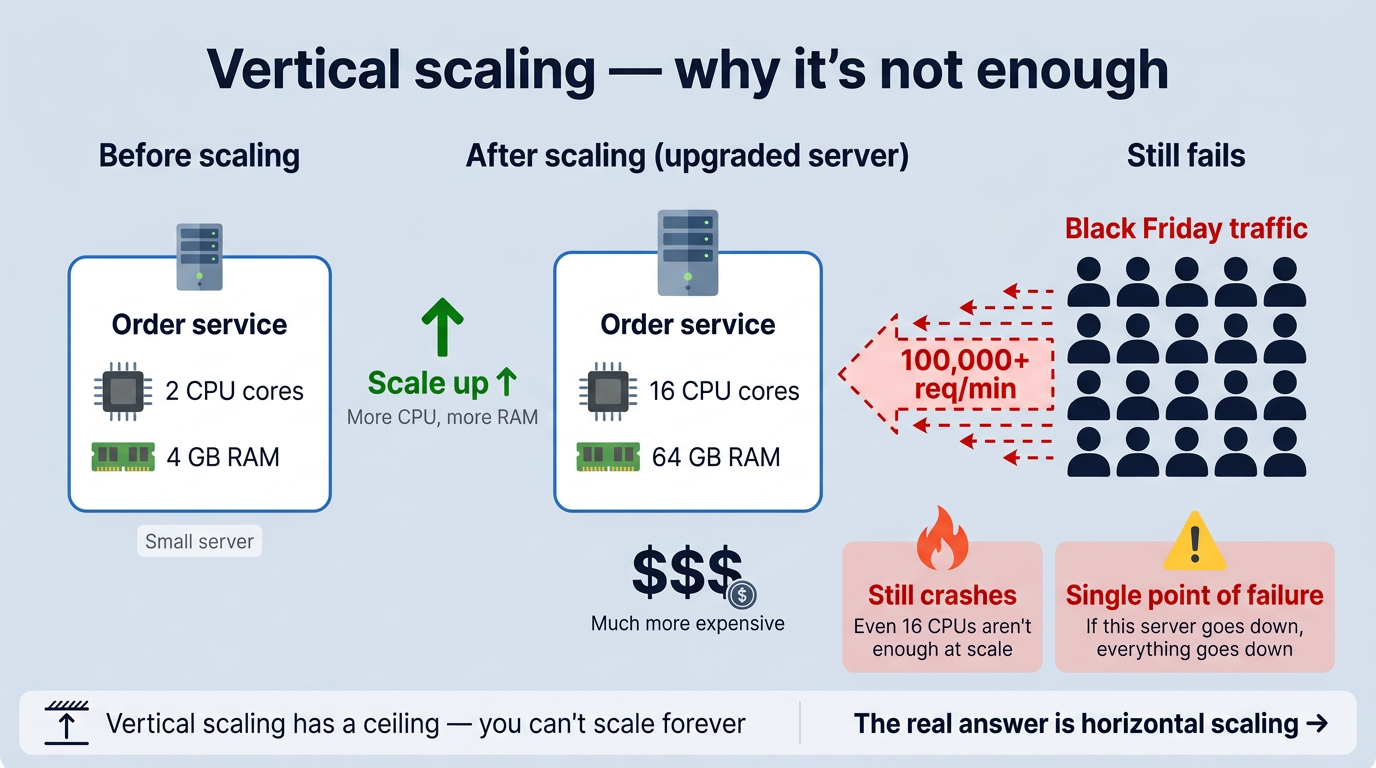
- There’s a ceiling. You can’t infinitely add resources to a single machine. At some point, even the biggest server maxes out under Black Friday-level traffic.
- It’s still a single point of failure. If that one upgraded server goes down, everything goes down with it.
So the real answer isn’t a bigger server. It’s more servers. That’s horizontal scaling, and load balancing is what makes it work.
The Solution: Multiple instances
Instead of one server doing everything, you run multiple copies of the same service. The load balancer sits in front and spreads the requests between them.
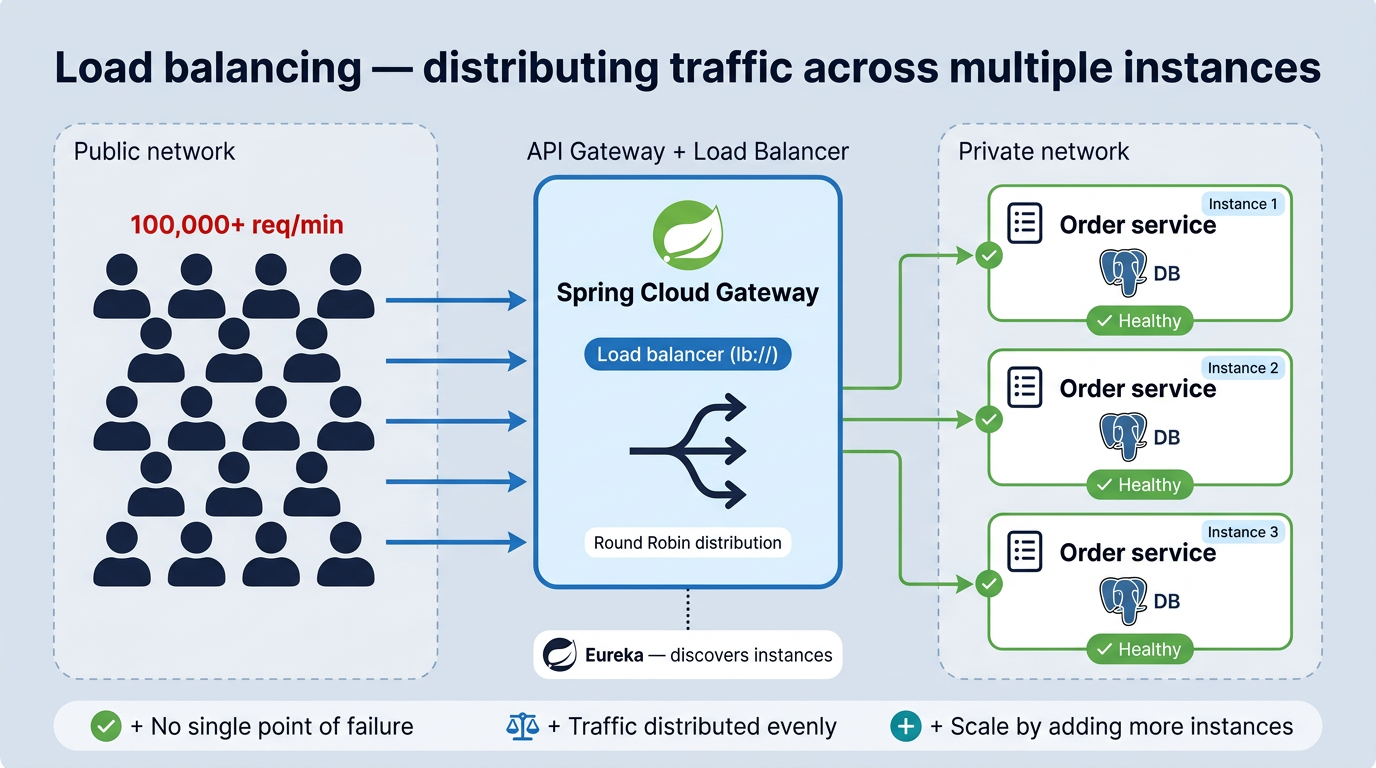
Each instance handles a portion of the traffic. If one instance struggles, the others pick up the slack.
With Spring Cloud Gateway and the lb:// prefix, this works automatically. The gateway asks Eureka for all registered instances of a service, then distributes requests across them.
But how does it decide which instance to use?
That’s where load balancing algorithms come in.
-
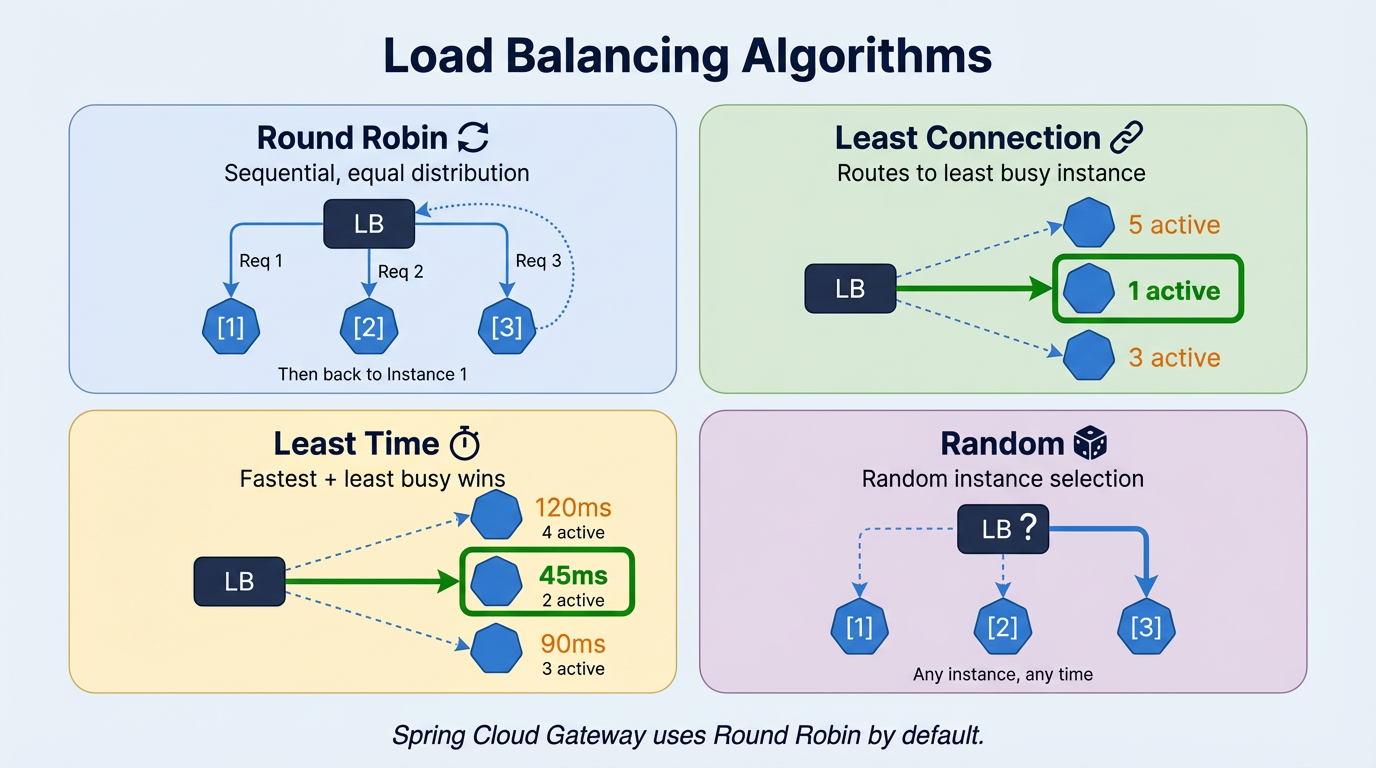
Round Robin: the simplest one. Requests go to each instance in turn: first to Instance 1, then Instance 2, then Instance 3, then back to 1. Equal turns, no favourites. Works well when your requests are all roughly the same size and cost.
-
Least Connection: instead of taking turns, the load balancer checks which instance is currently the least busy and sends the request there. Useful when some requests take much longer than others, so you avoid sending more work to an instance that’s already under pressure.
-
Least Time: a step further than Least Connection. It looks at both the number of active connections and how fast each instance is responding. The quickest and least busy instance wins. Good when you need to optimize for response speed, not just fairness.
-
Random: picks an instance randomly. No logic, no tracking. It sounds naive, but it works surprisingly well for stateless services with uniform traffic. Over time, the distribution evens out naturally.
Spring Cloud Gateway uses Round Robin by default. If you need a different strategy, you can configure it explicitly:
spring:
  cloud:
    loadbalancer:
      configurations: round-robin
Most projects never need to change it.
Resiliency
Load balancing assumes your instances are healthy. But services crash, networks drop, and databases time out, and that’s when things get messy.
Without any protection, one failing service can take down everything else. Product Service goes down, Order Service starts waiting for a response that never comes, threads pile up, Order becomes slow, and now Payment Service calling Order also hangs. Within seconds, one broken service has taken down several healthy ones. That’s a cascading failure.
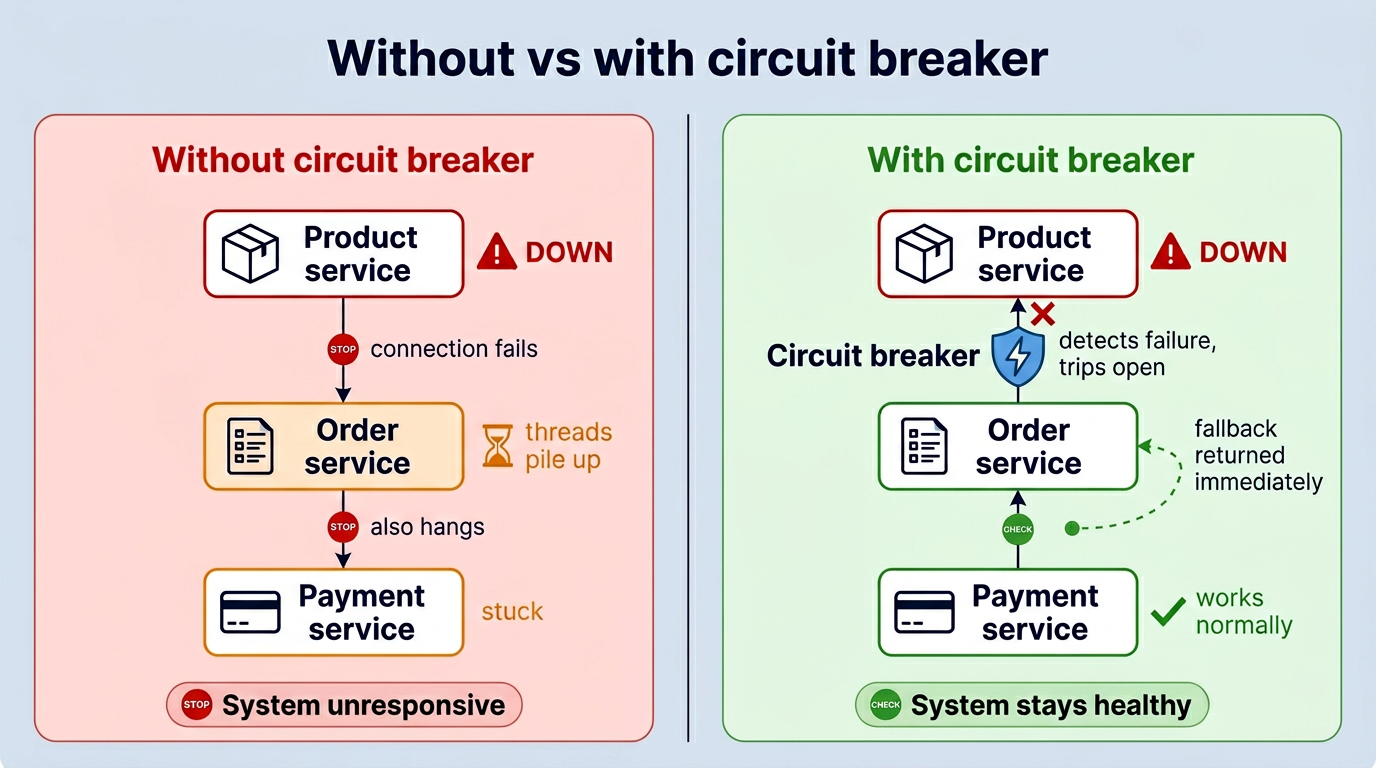
Resiliency patterns are designed to stop this chain reaction. In our project, we use Resilience4j and implement three patterns: Circuit Breaker, Fallback, and Rate Limiter.
Circuit Breaker
The Circuit Breaker is the first line of defence against cascading failures. The idea comes from electrical engineering, when there’s too much current, the breaker trips and cuts the circuit before it causes damage. Same concept here.
When too many calls to a service start failing, the circuit breaker opens and stops sending requests to that service entirely.
Three states
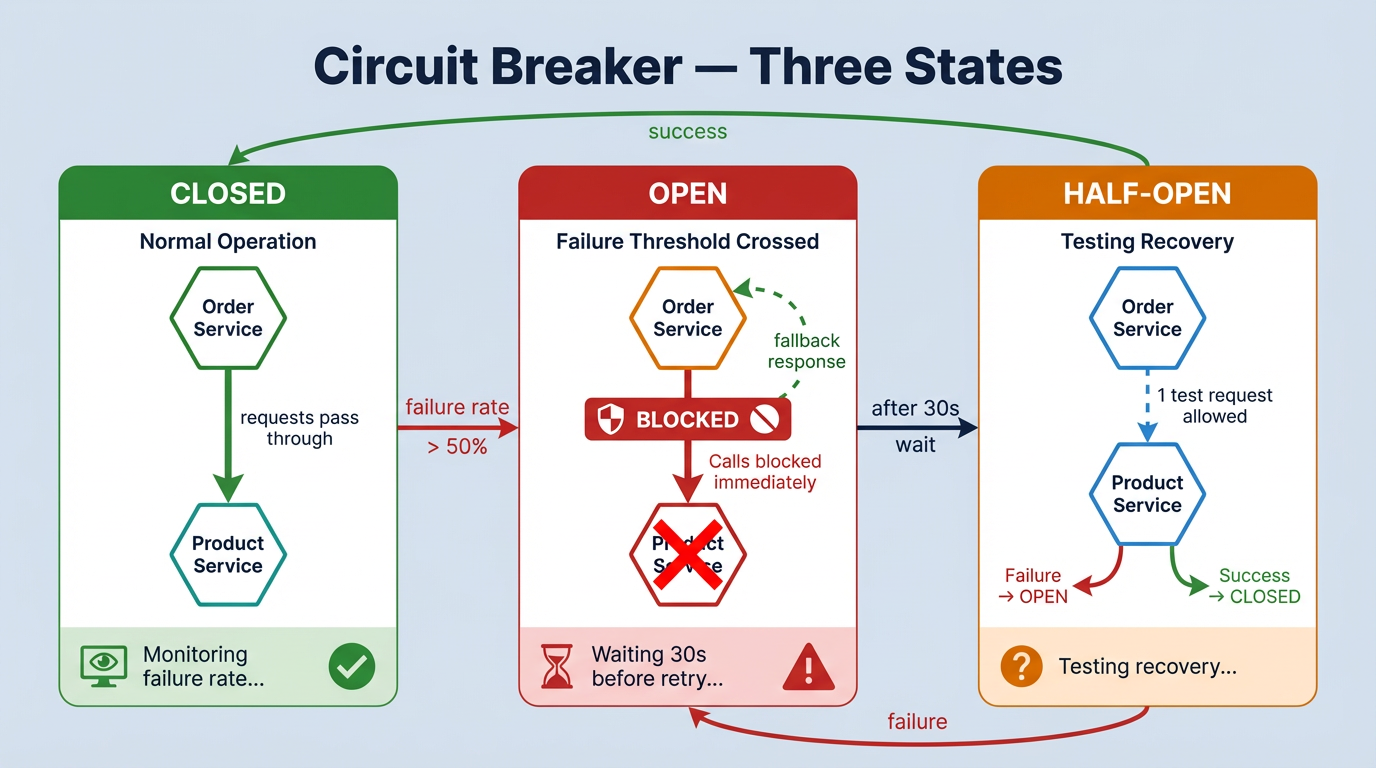
- CLOSED: everything is fine. Requests go through normally.
- OPEN: too many failures. Requests are blocked, a fallback runs instead.
- HALF-OPEN: testing if the service recovered. One request gets through: if it works, back to CLOSED. If not, back to OPEN.
In our project
We use Resilience4j and apply @CircuitBreaker on the critical service calls.
Order Service → Product Service: if Product is down, we can’t create an order without verifying the product exists. So we fail fast with a clear message.
@CircuitBreaker(name = "productService", fallbackMethod = "createOrderFallback")
public OrderDTO createOrder(OrderRequest orderRequest) {
    productClient.getProduct(orderRequest.getProductId());
    // ... create order logic
}

private OrderDTO createOrderFallback(OrderRequest orderRequest, Throwable throwable) {
    throw new OrderException("Product service is currently unavailable. Please try again later.");
}
Payment Service → Order Service: payments are sensitive, so we don’t want to lose them. Instead of failing, we save the payment as PENDING and retry later.
@CircuitBreaker(name = "orderService", fallbackMethod = "createPaymentFallback")
public PaymentDTO createPayment(PaymentRequest paymentRequest) {
    orderClient.getOrder(paymentRequest.getOrderId());
    // ... create payment logic
}

private PaymentDTO createPaymentFallback(PaymentRequest paymentRequest, Throwable throwable) {
    PaymentEntity pendingPayment = PaymentEntity.builder()
            .customerId(paymentRequest.getCustomerId())
            .orderId(paymentRequest.getOrderId())
            .status(PaymentStatus.PENDING)
            .createAt(LocalDateTime.now())
            .build();
    return paymentMapper.toDTO(paymentRepository.save(pendingPayment));
}
The thresholds are configured in shared-application-default.yml:
resilience4j:
  circuitbreaker:
    instances:
      productService:
        sliding-window-size: 5
        failure-rate-threshold: 50      # open if 50%+ of last 5 calls fail
        wait-duration-in-open-state: 30s
      orderService:
        sliding-window-size: 5
        failure-rate-threshold: 50
        wait-duration-in-open-state: 30s
  timelimiter:
    instances:
      orderService:
        timeout-duration: 3s            # slow = failure too
Worth knowing: the circuit breaker reacts to slow responses too, not just crashes. If Order Service takes more than 3 seconds to reply, that counts as a failure. Enough of those and the circuit opens, same as if the service was completely down.
Fallback
A fallback is what runs when a circuit is open or a call fails. It’s the safety net.
The right fallback depends on the situation. In our project, we use three different strategies:
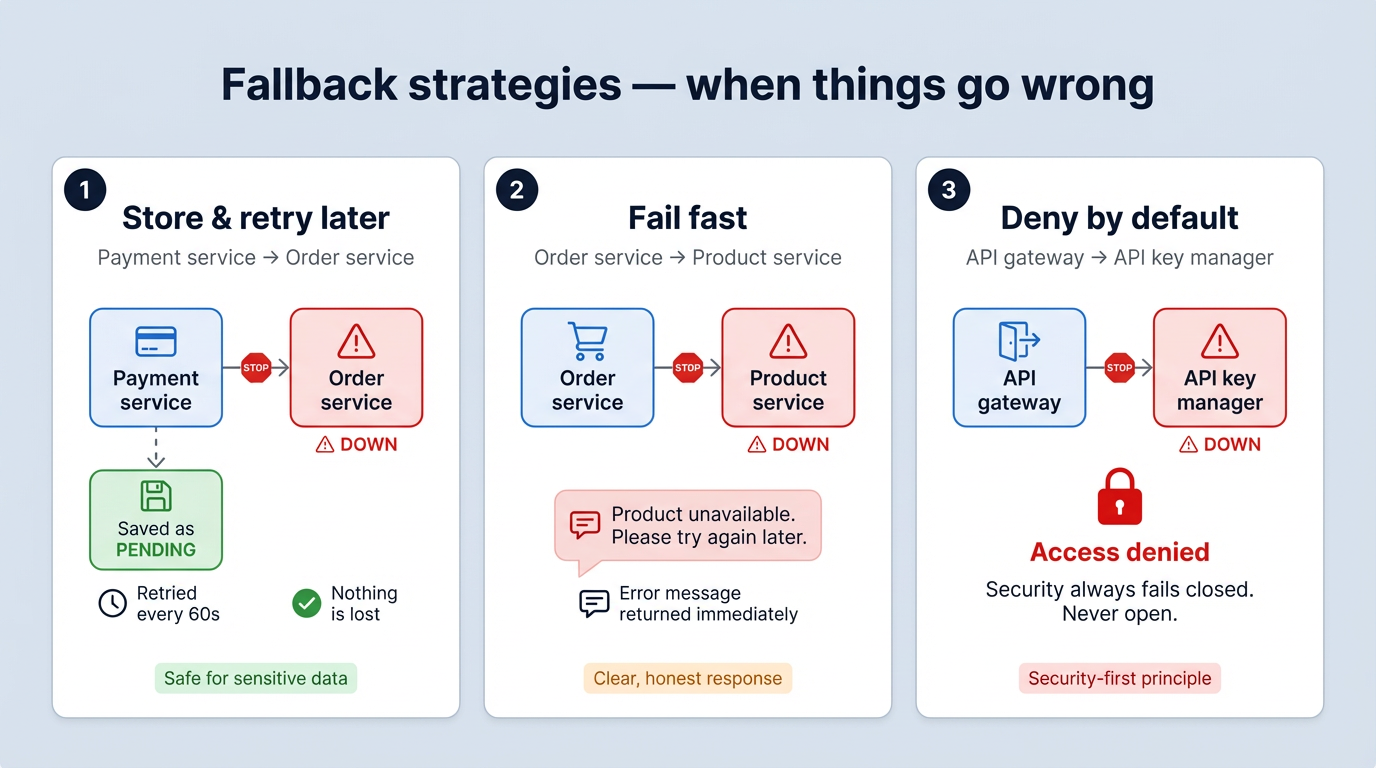
1. Store and retry later: used in Payment Service. If Order Service is down, the payment is saved with PENDING status. A scheduled job retries it every 60 seconds until it goes through. The user gets an immediate response, and nothing is lost. (see createPaymentFallback in the circuit breaker section above)
2. Fail fast with a clear message: used in Order Service. If Product Service is down, we can’t create an order without verifying the product. So we return a clear error message straight away. The user knows what happened and can try again. (see createOrderFallback in the circuit breaker section above)
3. Deny by default: used at the API Gateway for API key validation. If the API Key Manager is down, access is denied. Never the other way around. Security failures should always be closed, not open.
@CircuitBreaker(name = "apiKeyAuthorization", fallbackMethod = "fallbackIsAuthorized")
public boolean isAuthorized(String apiKey, String applicationName) {
    return apiKeyManagerClient.isKeyAuthorizedForApplication(apiKey, applicationName);
}

private boolean fallbackIsAuthorized(String apiKey, String applicationName, Exception ex) {
    return false; // deny access by default
}
Rate Limiter
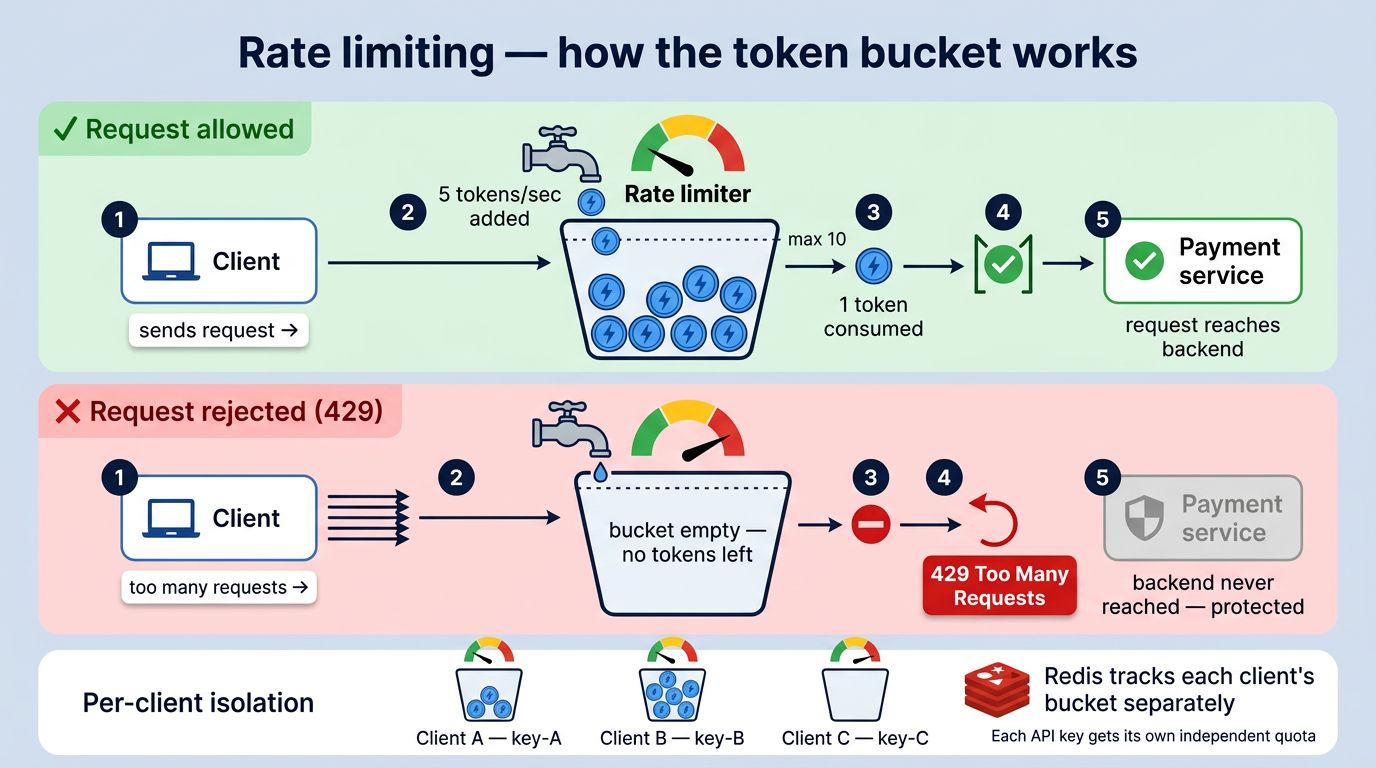
Rate limiting controls how many requests a client can make within a given time window. Requests that exceed the limit get a 429 Too Many Requests response.
Without it, one client sending too many requests can slow down or crash the service for everyone else.
In Spring Cloud Gateway, rate limiting is applied directly on the route using the RequestRateLimiter filter. It uses Redis to track request counts across multiple gateway instances:
spring:
  cloud:
    gateway:
      routes:
        - id: payment
          uri: lb://PAYMENT
          predicates:
            - Path=/api/v1/payments/**
          filters:
            - name: RequestRateLimiter
              args:
                redis-rate-limiter.replenishRate: 5     # 5 requests/second
                redis-rate-limiter.burstCapacity: 10    # allow short bursts
                redis-rate-limiter.requestedTokens: 1
                key-resolver: "#{@apiKeyResolver}"
The key-resolver identifies the client, in our case by API key, so each client gets their own quota:
@Bean
public KeyResolver apiKeyResolver() {
    return exchange -> Mono.just(
        Optional.ofNullable(exchange.getRequest().getHeaders().getFirst("X-API-KEY"))
            .orElse(exchange.getRequest().getRemoteAddress().getAddress().getHostAddress())
    );
}
The algorithm used here is Token Bucket: a bucket holds a fixed number of tokens, each request consumes one, and tokens are replenished at a steady rate. If the bucket is empty, the request is rejected. This allows short bursts while maintaining a controlled average rate.
The gateway is ready. But who gets in?
Routing sends requests to the right place. Load balancing spreads the load. Circuit breaker, fallback, rate limiter: all working together to keep the system up when things go wrong.
That’s a lot. But there’s one thing still missing.
The gateway accepts every request that arrives. No questions asked. In production, that’s not enough. You need to know who’s calling, and whether they’re allowed to.
That’s what Part 04 is about. API key validation and OAuth2 via Keycloak, both handled at the gateway, so none of the services behind it ever have to deal with authentication themselves.
A door without a lock is just an entrance.
Resources
- Full guide: miliariadnane.gitbook.io/demo-microservices
- GitHub: github.com/miliariadnane/demo-microservices
Next — Part 04: Security — API Key Manager, OAuth2 & Keycloak.