Let’s be honest, framework migrations can be a real pain. They’re often slow, risky, and the kind of task that gets pushed to the next sprint, and then the next. I was facing this exact problem with a Spring Boot 2 microservices open source project, but I found a way to get it done in just 5 minutes using a tool called OpenRewrite. In this article, I’ll show you exactly how.
What is OpenRewrite?
At its core, OpenRewrite is a powerful open-source tool for refactoring code at scale. Forget simple “search & replace”; OpenRewrite parses your code into a tree structure, so it makes changes based on what the code means, not just what it says. This allows for incredibly precise and safe migrations and transformations.
It was originally built by Netflix to handle their massive codebases and is now maintained by Moderne. While I’m using it for Java, it also supports XML, YAML, and more.
Here’s what makes it stand out:
- It thinks in code, not text: This is the core of its semantic refactoring power.
- Built for scale: It’s designed to apply changes consistently across huge projects.
- Format preservation: It makes changes without messing up your existing code formatting.
- It’s extensible: You can write your own transformation rules, which it calls “recipes.”
How Does OpenRewrite Work Internally?
The magic behind OpenRewrite is its three-stage process:
- Parse: First, it parses your source code into a detailed Abstract Syntax Tree (AST). Think of this as a complete map of your code, including its structure, types, and even formatting.
- Transform: Next, it runs “recipes” that visit this tree and make changes.
- Print: Finally, it converts the modified tree back into source code, carefully preserving your original formatting.
What are “Recipes”?
Recipes are the core of OpenRewrite. They are the instructions for how to change the code. A recipe can be simple or incredibly complex, chaining together other recipes to perform large-scale migrations.
Here’s a simple recipe that finds and replaces a specific string literal in the code:
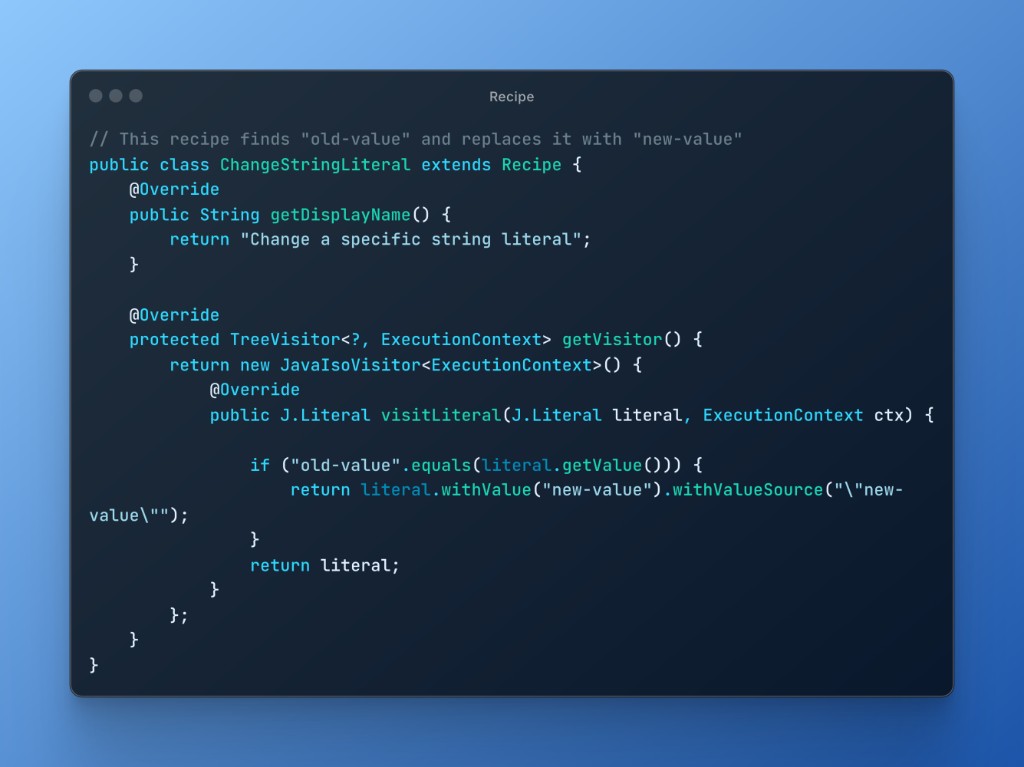
The real power is that these recipes are combined. The SpringBoot2To3Migration recipe, for example, isn’t one single instruction; it’s a collection of hundreds of smaller, targeted recipes that each handle one specific change. This includes things like:
- Upgrading Java: Migrate the project to Java 17.
- Namespace Migration: Moving all
javax.*packages tojakarta.*. - Spring Security: Updating security configurations for version 6.
- Property Files: Replacing deprecated keys in
application.properties. - And much more: Handling countless other dependency and API changes.
The Recipe Ecosystem
OpenRewrite’s power comes from its huge library of recipes. These can be simple, single-purpose rules or complex recipes that bundle hundreds of smaller changes together.
For instance, the SpringBoot2To3Migration recipe is actually a composite recipe that includes smaller recipes for specific tasks:
# A simplified look at what the main recipe includes
org.openrewrite.java.spring.boot3.SpringBoot2To3Migration:
  - org.openrewrite.java.migrate.JavaVersion17
  - org.openrewrite.java.migrate.javax.JavaxToJakarta
  - org.openrewrite.java.spring.boot3.UpgradeSpringBoot_3_0
  - org.openrewrite.java.spring.security6.UpgradeSpringSecurity_6_0
While there are hundreds of recipes, they generally fall into a few key categories:
- Framework Migrations: Beyond Spring Boot, there are recipes for upgrading JUnit 4 to 5, migrating logging frameworks, and more.
- Security Fixes: These recipes can automatically fix common vulnerabilities, like updating insecure dependencies or replacing unsafe API calls.
- Code Quality: Keep your codebase clean with recipes that remove unused imports, simplify boolean expressions, and enforce style conventions.
You can explore all the available recipes in the official OpenRewrite recipe catalog.
OpenRewrite in Action: Migrating from Spring Boot 2 to Spring Boot 3
So, how did I actually do it? My project was an open-source application with several Spring Boot 2.7.x microservices on Java 11. A manual migration would have been a week-long headache of dependency changes, API updates, and endless testing. Here’s how I did it in minutes.
Step 1: Configure the Parent POM
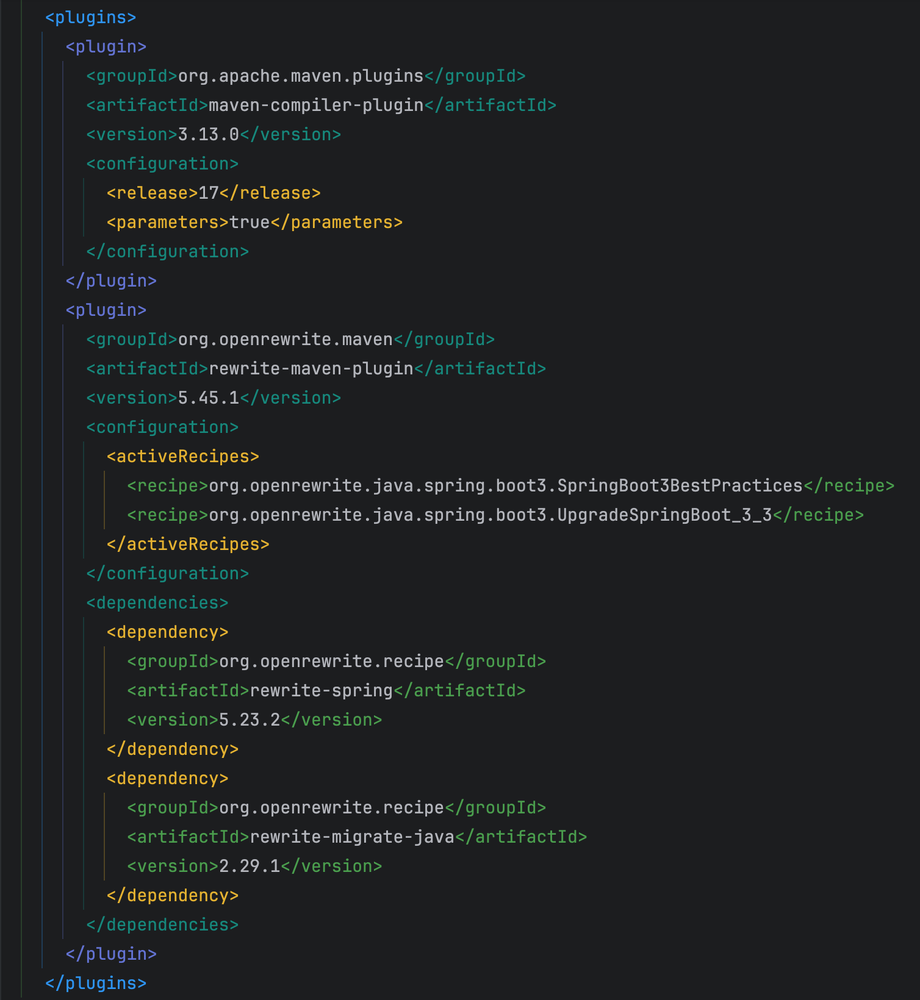
Everything starts in the parent pom.xml. Since Spring Boot 3 requires Java 17, the first thing I did was set the compiler release version.
Next, I added the OpenRewrite plugin with two specific recipes. Instead of one giant migration recipe, this approach gives a cleaner result:
UpgradeSpringBoot_3_3: This is the workhorse. It handles the core migration, including dependency bumps and the criticaljavaxtojakartanamespace switch.SpringBoot3BestPractices: Once migrated, this recipe cleans things up by applying modern Spring Boot 3 conventions.
Here is the exact configuration I used in my parent pom.xml:
Step 2: Run the Migration
I always start with a dryRun. This is a safety check that shows you all the proposed changes without modifying any files.
mvn rewrite:dryRun
The report looked good, so I ran the migration for real:
mvn rewrite:run
Step 3: Verify the Results
And that was it. In just a few minutes, OpenRewrite had:
- ✅ Upgraded the entire project to Spring Boot 3.3 and Java 17.
- ✅ Migrated all
javax.*imports tojakarta.*. - ✅ Applied dozens of Spring Boot 3 best practices.
- ✅ Fixed countless deprecated APIs and classes.
Of course, I didn’t just trust it blindly. I immediately ran a compile and the test suite:
mvn clean compile
mvn test
A couple of tests failed due to some specific behavior changes between the Spring Boot versions, but these were minor and easy to fix. The vast majority of the work was done automatically.
An Even Easier Way: The IDE Plugin
While the Maven approach is great for automation, there’s an even more interactive way to do this right from your editor. The OpenRewrite plugin for IntelliJ IDEA makes the process visual.
Instead of manually configuring your pom.xml, the plugin scans your build files and automatically suggests relevant migrations.
Here’s the simple workflow I followed:
- Install the Plugin
- Find the Recipe: After a quick restart, I opened my
pom.xmland clicked the small OpenRewrite icon that appeared in the editor’s toolbar. The IDE instantly showed me a list of applicable recipes, including the Spring Boot 3 upgrade. - Run and Preview: I selected the recipe and ran it.
This is a fantastic way to discover new recipes and safely apply changes without ever leaving your IDE.
Organizing Your Recipes with rewrite.yml
For even more control, you can also define your recipe collections in a dedicated rewrite.yml file. This is a nice way to version control your migration strategy and share it with your team.
As the JetBrains documentation shows, you can create a YAML file to list the exact recipes you want to run. This keeps your pom.xml clean and your migration logic all in one place.
Advantages and Limitations of OpenRewrite
Like any tool, OpenRewrite isn’t perfect. Here’s my honest take on its pros and cons.
The Advantages
- It saves a ton of time: What would have taken me days of manual work was done in minutes. This is its biggest win.
- Fewer mistakes and great for consistency: Automation means fewer chances for human error. The changes are consistent and reliable.
Limitations
- Writing custom recipes is hard: While using existing recipes is easy, creating your own has a steep learning curve.
- You still have to test: OpenRewrite handles the syntax changes, but you should always run your test suite afterward.
Conclusion
Is It Worth It? Absolutely.
It turned a week-long headache of a migration into a 5-minute task. It has completely transformed how I approach framework upgrades or large scale refactoring.
If you’re facing a migration, give it a try. You won’t regret it.
Useful Resources
- OpenRewrite Documentation - Complete guide and recipes
- Recipe Catalog - Browse all available recipes
- Spring Boot 3 Migration Recipes - Specific Spring Boot migration recipes
- OpenRewrite IDE Plugin - IntelliJ IDEA plugin