A few months, I had a discussion with a team colleague concerning securing Rest services in spring boot and the way to manage users Authentication/Authorization. The first thing that jumped to our conversation was the JWT method, and the operating mode of the filters within the architecture, I mean here ”AuthenticationFilter” and ”Authorization Filter”.
Before we get into the implementation of JWT in the spring boot framework of java, let’s take a quick about the JWT concept and how it works to do authentication :
Part 1: The JWT definition and structure
JSON Web Token (JWT) is an open standard (RFC 7519) wich transmitting information between parties as JSON object.
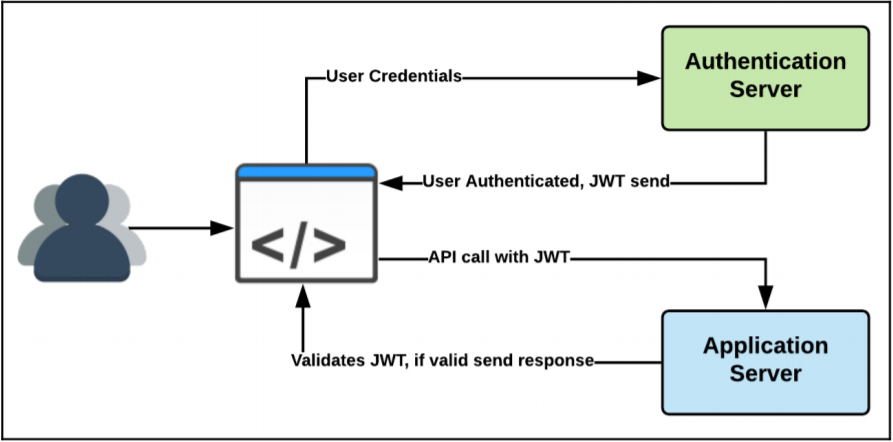
In the past, the stateless nature of HTTP was circumvented in a web application by associating each request with a session ID created on the server and then stored by the client using cookies. Each request sends the cookie (session ID) in the form of an HTTP header, which gets validated by the server, and a state (a user session) is associated with each request. In modern applications, a server-side session ID is replaced with the JWT. The following diagram shows the workings of the JWT:
“JWT is used to carry information related to the identity and characteristics (claims) of the client bearing the token. This token is created during the authentication process and is verified by the authorization server before any processing. It is used by a resource server to allow a client to present a token representing its “identity card” to the resource server, and allows the resource server to verify the validity and integrity of the token in a stateless, secure manner” ‘’ Spring Security by Robert Winch Mick Knutson Peter Mularien ‘’ Spring Security by Robert Winch Mick Knutson Peter Mularien
Unlike common security mechanisms, such as encryption, obscuring, and hiding, the JWT doesn’t encrypt or hide the data, but to ensure the authenticity of the data, also it’s a token-based stateless authentication mechanism, which is extremely useful in distributed systems and microservices architecture, using the Private-Public Key signing method.
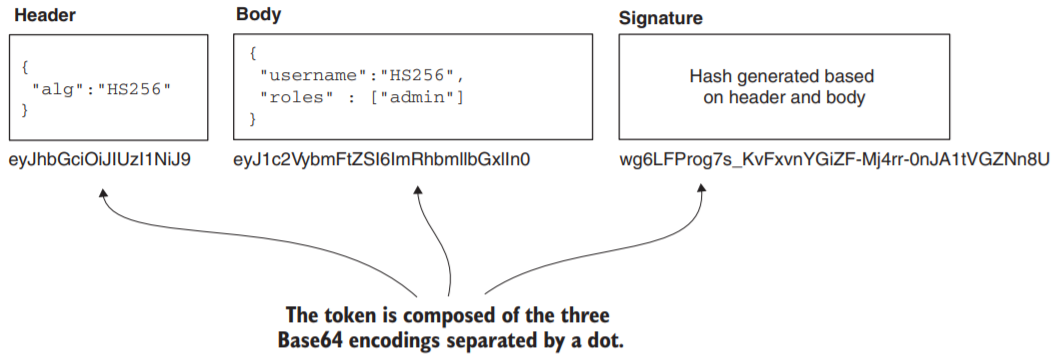
Part 2: Structure of JWT
The structure of the JWT consists of a header, payload, and a signature
JWT = header.payload.signature
Part 3: Hello Spring Security
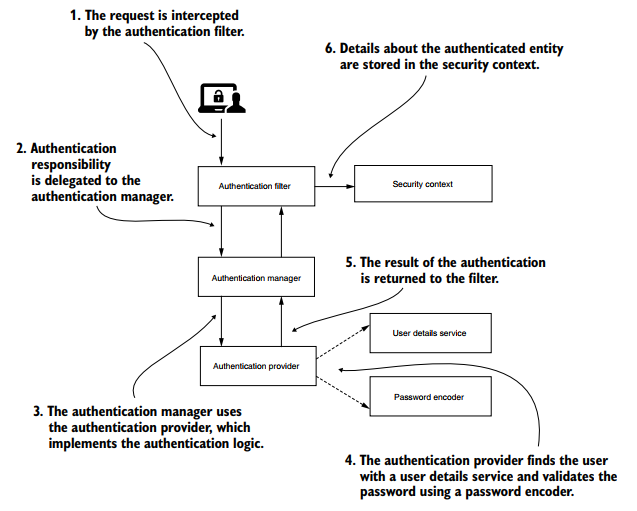
In the figure, we can see the main actors in the Spring Security architecture and the relationships among these. In the demo project, I will implement this architecture. But before we should explain the relationships among the entities that are part of the authentication and especially the part of filters and configuration class.
Part 4: Show me the code !
So enough with the theory; let’s get down to some actual code. I have created a small project demo project that showcases the signed JWT using spring boot with a client-side using angular !
As I have mentioned in the title of the blog, We’ll use the jsonwebtoken.io library to implement the JWT.
Now that we have an idea of how the client-server interaction works, we can start looking at our project structure:

Implementation
4.1. Maven configuration of jwt :
<dependency>
  <groupId>io.jsonwebtoken</groupId>
  <artifactId>jjwt</artifactId>
  <version>0.9.1</version>
</dependency>
4.2. Security Configuration and filters
- Authentication Filter :
First thing first, we should create an authentication filter, that will check if the credentials are valid (using the attemptAuthentication method) and if so, it will build a token and send it to the client, as follows:
/* check authentication of the user */
@Override
public Authentication attemptAuthentication(HttpServletRequest req, HttpServletResponse res)
            throws AuthenticationException {
    try {

        /* UserLoginRequest contain email & password (class in requests package) */

        UserLoginRequest creds = new ObjectMapper().readValue(req.getInputStream(), UserLoginRequest.class);

        return authenticationManager.authenticate(
                new UsernamePasswordAuthenticationToken(creds.getEmail(), creds.getPassword()));

    } catch (IOException e) {
        throw new RuntimeException(e);
    }
}

/* When a user sign in in with a correct username and password, the authentication manager will create a token and send it to the client */
@Override
protected void successfulAuthentication(HttpServletRequest req,
                                        HttpServletResponse res,
                                        FilterChain chain,
                                        Authentication auth) throws IOException, ServletException {

      User user = ((User) auth.getPrincipal());

      Collection<? extends GrantedAuthority> authorities = auth.getAuthorities();

      ArrayList<String> authsList = new ArrayList<>(authorities.size());

      for (GrantedAuthority authority : authorities) {
          authsList.add(authority.getAuthority());
      }

      String userName = user.getUsername();

      // context is a mecanism give us the possiblity to retrieve in any place in the app as a "bean"
      // we should declare the context in the / of the project
      UserService userService = (UserService) SpringApplicationContext.getBean("userServiceImpl");

      UserDto userDto = userService.getUser(userName);

      /* build token */
      String token = Jwts.builder()
              .setSubject(userName)
              .claim("id", userDto.getId())
              .claim("Role", auth.getAuthorities().stream().map(u->u.getAuthority()).collect(Collectors.toList()))
              .setExpiration(new Date(System.currentTimeMillis() + SecurityConstants.EXPIRATION_TIME))
              .signWith(SignatureAlgorithm.HS512, SecurityConstants.TOKEN_SECRET )
              .compact();

      res.addHeader(SecurityConstants.HEADER_STRING, SecurityConstants.TOKEN_PREFIX + token);
      res.addHeader("user_id", userDto.getUserId());
      res.getWriter().write("{\"token\": \""+ token + "\", \"id\": \""+userDto.getUserId()+"\"}");
}
- Authorization Filter :
The second thing is to create a filter that will validate the JWT token and if it is valid, it will set the user principal in the security context, it’s exaclty the authorization filter that will do this :
@Override
protected void doFilterInternal(HttpServletRequest req,
                                HttpServletResponse res,
                                FilterChain chain) throws IOException, ServletException {

    // test if req contain header with HEADER_STRING(Authorization)
    String header = req.getHeader(SecurityConstants.HEADER_STRING);

    // if null or doesn't conatin TOKEN_PREFIX
    if (header == null || !header.startsWith(SecurityConstants.TOKEN_PREFIX)) {
        chain.doFilter(req, res);
        return;
    }

    UsernamePasswordAuthenticationToken authentication = getAuthentication(req);
    // if the user has valid token, allow pricing the request by adding the user to the security context
    SecurityContextHolder.getContext().setAuthentication(authentication);
    chain.doFilter(req, res);
}
So now that we have the authentication filter and the authorization filter, we can create the main class (WebSecurity class) that will call those two filters in configuration process, also it will handle the /user/login route for signing:
protected AuthenticationFilter getAuthenticationFilter() throws Exception{
  final AuthenticationFilter filter = new AuthenticationFilter(authenticationManager());
  filter.setFilterProcessesUrl("/users/login");
  return filter;
}
Now that we have our security layer ready, we can verify the authentication using a REST client like Insomnia or try to run angular client-side to test all the endpoints.
Again the full source code can be found here: https://github.com/miliariadnane/spring-boot-security-jwt
If you have any suggestion, questions or remarks, please feel free to comment below.