
Our gateway can route requests, balance traffic, and handle failures. Now we need to decide who gets in and what they’re allowed to do.
That brings us to two concepts you’ll hear constantly in security: authentication (authn) and authorization (authz).
Authentication is proving who you are. A user logs in with a password. A client sends an API key. Either way, it’s about proving identity.
Authorization is deciding what you can do. OK, you’re authenticated. But can you call the Payment service? Can you hit the admin endpoints? That depends on your role and permissions.
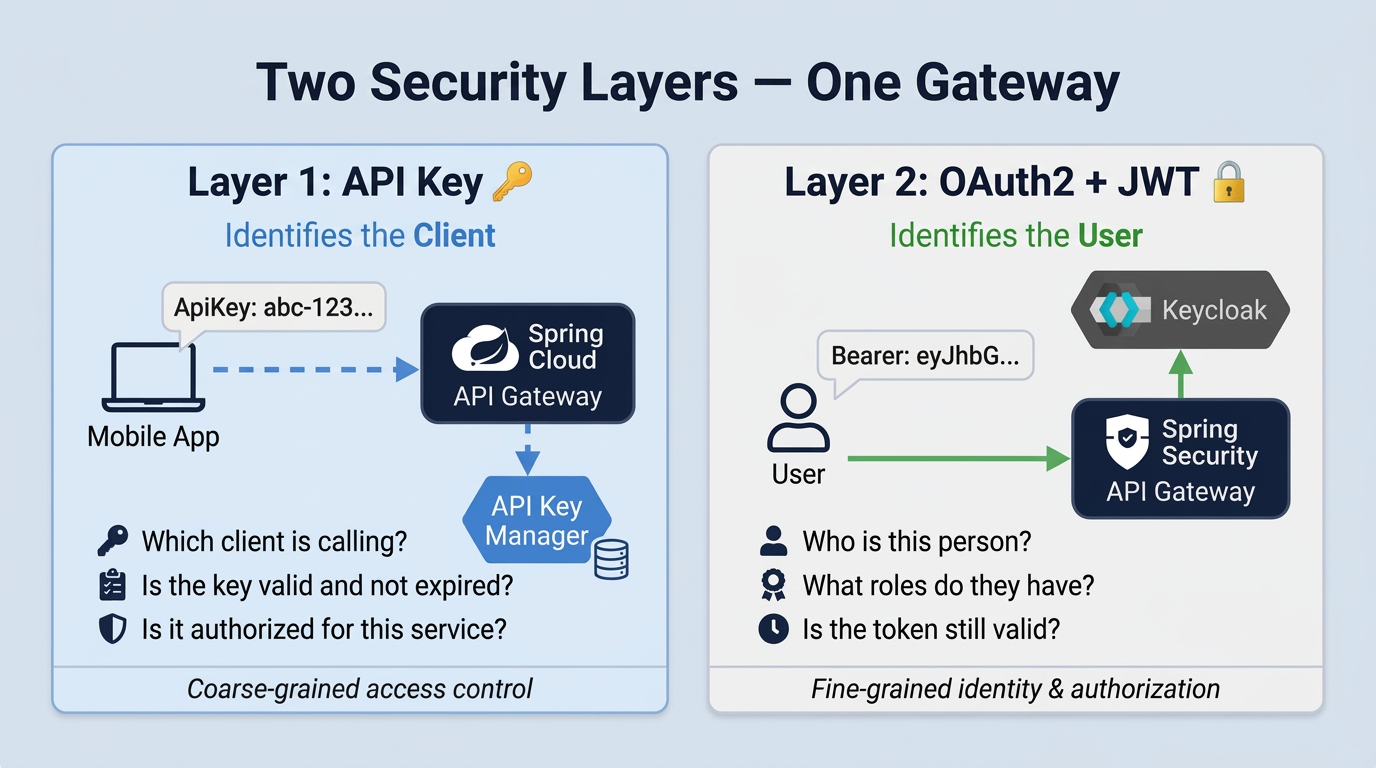
We handle both at the gateway. API keys take care of client authentication. OAuth2 with Keycloak handles user authentication and authorization. The services behind the gateway don’t touch any of this. If a request made it through, it’s already been checked.
Two layers, two different problems
Why two layers? Because they answer different questions.
API keys are about client authentication. You generate a key, give it to a mobile app or a frontend, and that app sends it in a header with every request. The gateway checks if the key is valid and if it’s allowed to call this specific service. That’s it. The key says nothing about the person using the app.
OAuth2 with JWT is about user authentication and authorization. The user logs in through Keycloak, gets a JWT token with their name and roles, and sends it along. The gateway reads the token and knows exactly who this person is and what they should have access to.
API Key Manager
Key management involves generating keys, tracking expiration, revoking compromised ones, controlling which key works with which service. We didn’t want all of that inside the gateway, so we built a separate microservice for it: the API Key Manager, with its own database.
The flow
- Client sends a request with an
ApiKeyheader - Gateway’s
GlobalFilterintercepts it and reads the key - Gateway asks the API Key Manager: “Is this key valid for this service?”
- Key checks out? Request goes through. Doesn’t?
401 Unauthorized
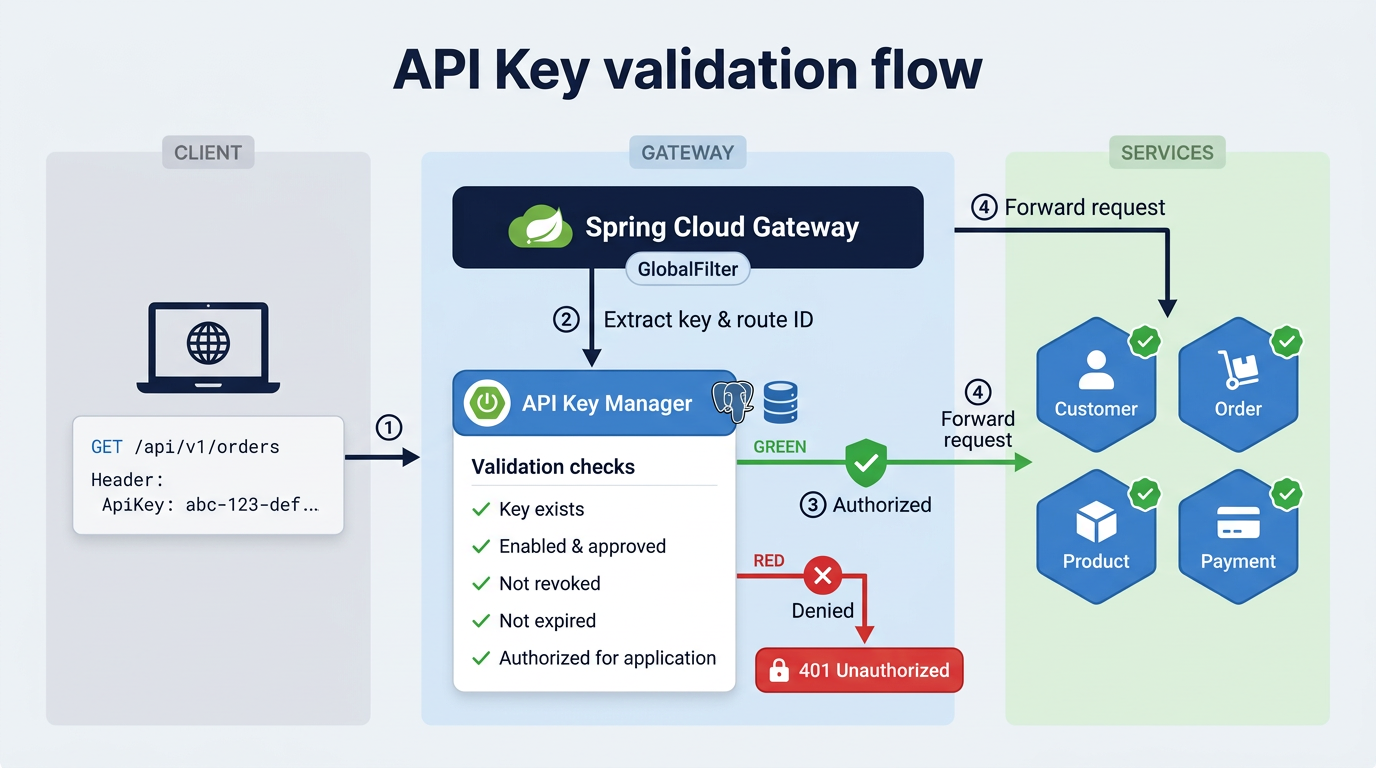
Keys are scoped to services
Each key is linked to specific services. One key might work for Customer and Product but get rejected by Payment. The services are represented as an enum:
public enum ApplicationName {
    CUSTOMER, PRODUCT, ORDER, PAYMENT, NOTIFICATION, APIKEY_MANAGER
}
The filter uses the route ID to figure out which service is being targeted. A request hitting /api/v1/orders/** has route ID order, so the filter checks the key against ORDER.
The API Key Manager then goes through a checklist. Everything has to pass:
- ✅ Does the key exist?
- ✅ Is it enabled?
- ✅ Is it approved?
- ❌ Is it revoked?
- ❌ Is it expired?
- ✅ Is the application enabled for this key?
The filter at the gateway
It’s a GlobalFilter, meaning it runs on every request that comes in:
@Component
public class ApiAuthorizationFilter implements GlobalFilter, Ordered {

    @Value("${spring.security.api-key.enabled:true}")
    private boolean apiKeyEnabled;

    @Override
    public Mono<Void> filter(ServerWebExchange exchange, GatewayFilterChain chain) {
        if (!apiKeyEnabled) return chain.filter(exchange);

        Route route = exchange.getAttribute(ServerWebExchangeUtils.GATEWAY_ROUTE_ATTR);
        String applicationName = route.getId();
        List<String> apiKey = exchange.getRequest().getHeaders().get("ApiKey");

        if (applicationName == null || Objects.requireNonNull(apiKey).isEmpty()) {
            throw new ResponseStatusException(HttpStatus.UNAUTHORIZED,
                "You are not authorized to access this resource");
        }
        return chain.filter(exchange);
    }
}
Setting apiKeyEnabled to false disables the check entirely, which is useful during local development.
What happens when the API Key Manager is down?
Since the gateway calls the API Key Manager over the network, we need to handle the case where that service is unavailable. We apply the same pattern from Part 03: a circuit breaker with caching.
@Cacheable(value = "apikey-authorizations", key = "#apiKey + '-' + #applicationName")
@CircuitBreaker(name = "apiKeyAuthorization", fallbackMethod = "fallbackIsAuthorized")
public boolean isAuthorized(String apiKey, String applicationName) {
    return apiKeyManagerClient.isKeyAuthorizedForApplication(apiKey, applicationName);
}

private boolean fallbackIsAuthorized(String apiKey, String applicationName, Exception ex) {
    return false;
}
The fallback returns false, which means access denied. Same principle we saw in Part 03: when verification isn’t possible, the safe default is to reject. This is called failing closed.
OAuth 2.0: authentication and authorization for users
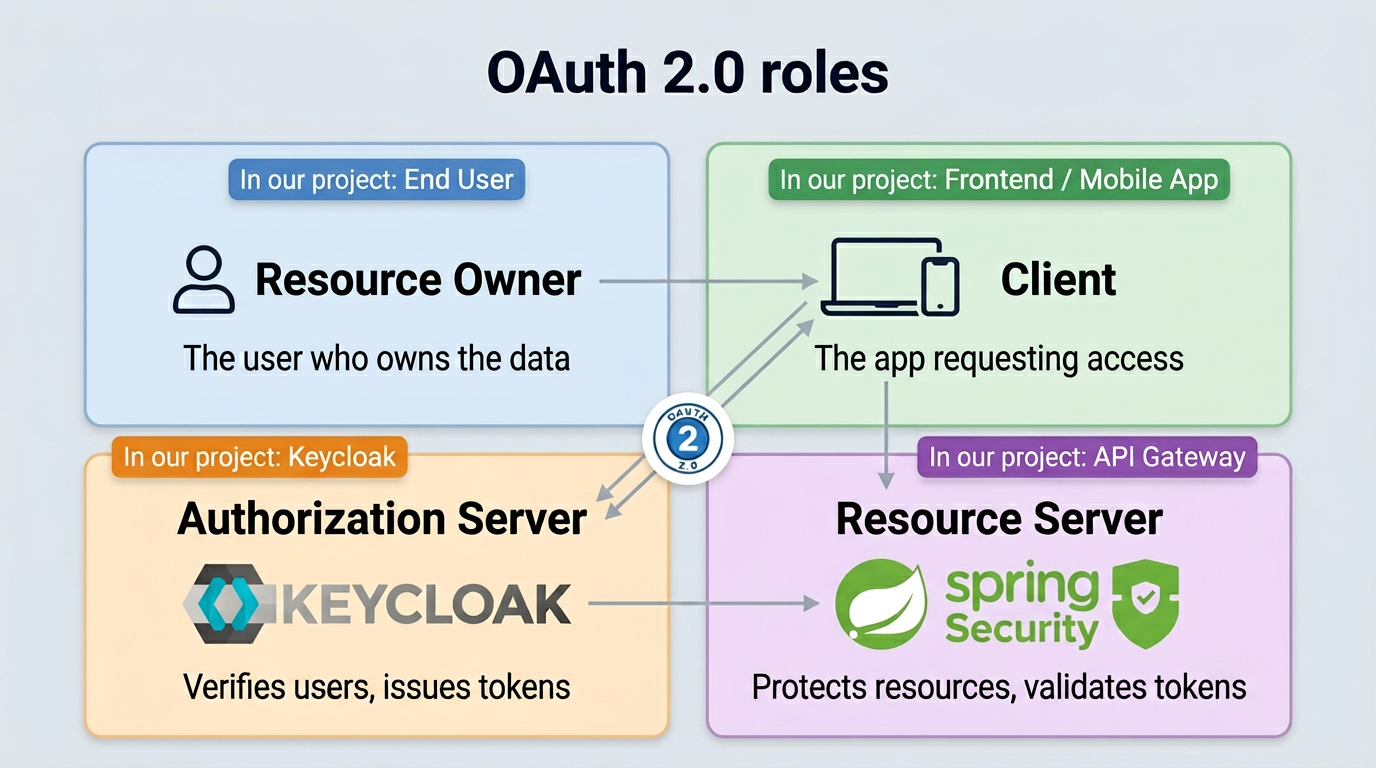
API keys identify the app. OAuth 2.0 identifies the person.
Instead of every app storing user passwords, you delegate that to a trusted authorization server. The user logs in there and gets a token back. Your app uses the token, never the password. Like a hotel front desk handing you a key card that only opens your room for a limited time.
The 4 roles
Every OAuth 2.0 flow involves four actors:
How it works, step by step
Let’s look at how the most common flow works: the Authorization Code grant.
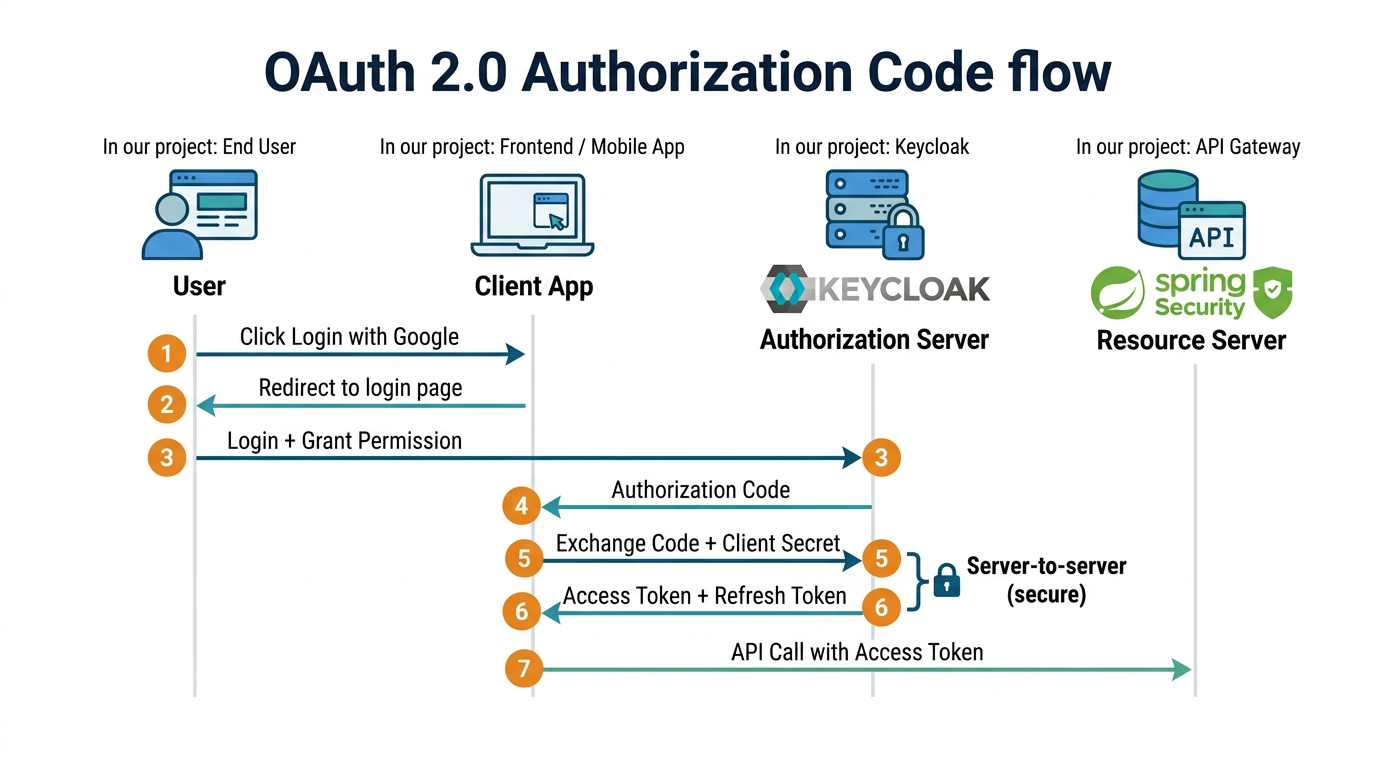
The important thing here: the user’s password never reaches the client app. It only goes to the Authorization Server. Steps 5 and 6 happen server-to-server, which means the token stays hidden from the browser too.
OAuth 2.0 grant types (flows)
There’s more than one way to get a token in OAuth 2.0. These are called grant types, and each one is designed for a specific kind of client.
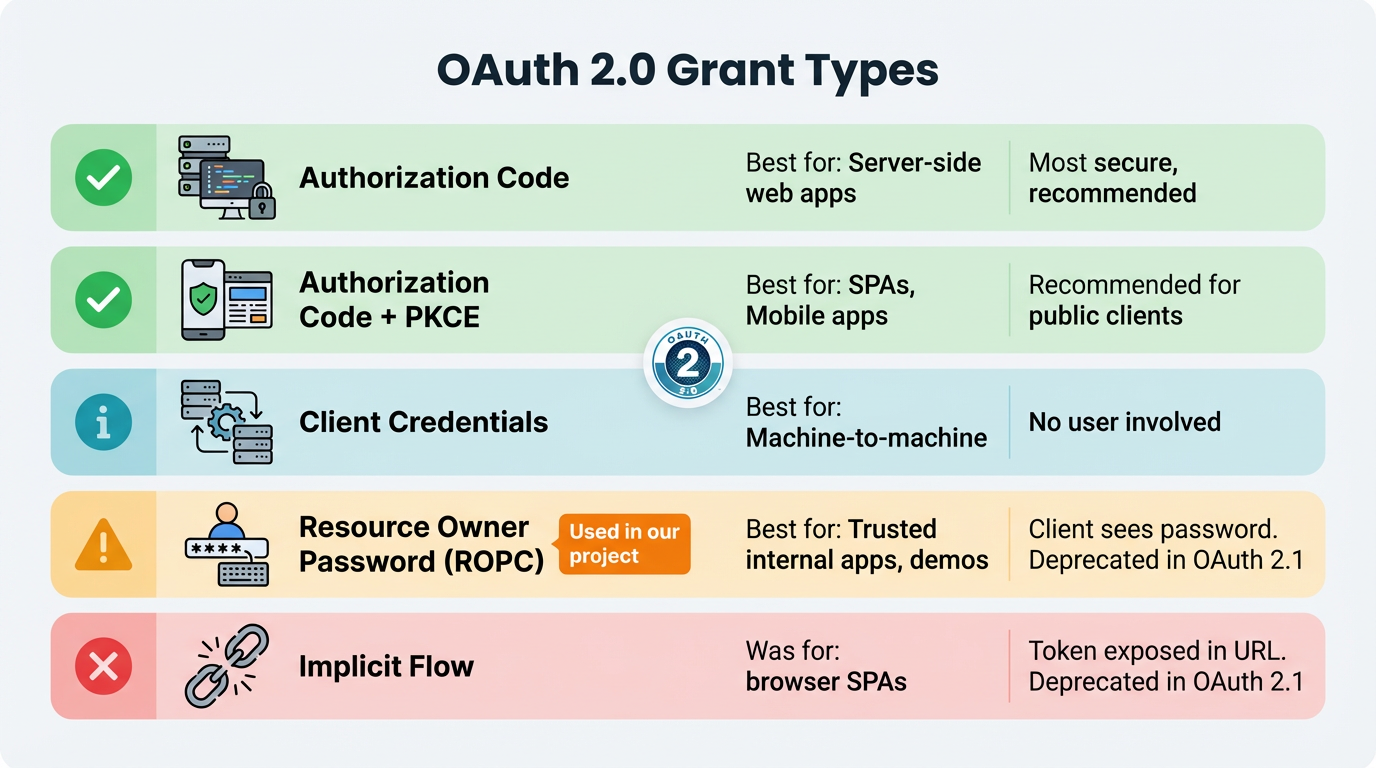
In our project, we go with Resource Owner Password. The client sends the username and password straight to Keycloak, gets a token back, done. It’s the simplest option for a demo.
Every grant type ends the same way: you get a JWT (JSON Web Token). The gateway verifies it locally using Keycloak’s public key, so there’s no extra network call on each request.
Keycloak: our authorization server
Keycloak is an open-source identity manager. It handles user login, token generation, and role management so we don’t have to build any of that ourselves. We run it as a Docker container.
Setup
keycloak:
  image: quay.io/keycloak/keycloak:25.0.1
  command: start-dev --import-realm
  volumes:
    - ../config/keycloak:/opt/keycloak/data/import
  environment:
    KEYCLOAK_ADMIN: admin
    KEYCLOAK_ADMIN_PASSWORD: admin
  ports:
    - "8180:8080"
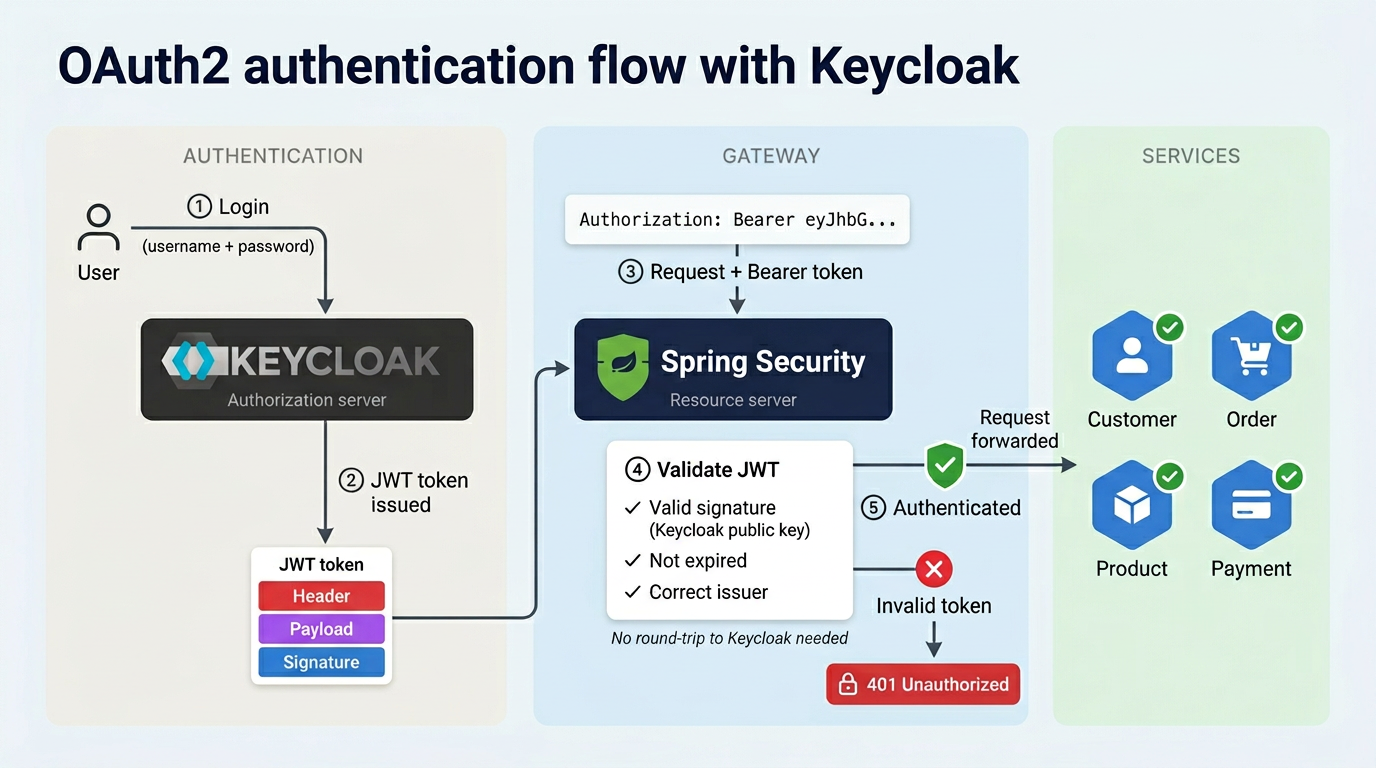
Getting a token
With the Resource Owner Password grant, one curl call is all you need:
curl -X POST http://localhost:8180/realms/demo-realm/protocol/openid-connect/token \
  -d "grant_type=password" \
  -d "client_id=demo-client" \
  -d "client_secret=${CLIENT_SECRET}" \
  -d "username=user" \
  -d "password=password"
Keycloak checks the credentials and returns a JWT. The user’s roles are inside the token under realm_access.roles.
Validating tokens at the gateway
The gateway acts as the Resource Server. It receives the JWT and decides: valid or not.
Spring Security makes this easy. You point it to Keycloak’s issuer-uri, and it fetches the public keys automatically to verify every incoming token:
@Configuration
@EnableWebFluxSecurity
public class SecurityConfig {

    @Bean
    public SecurityWebFilterChain securityWebFilterChain(ServerHttpSecurity http) {
        http
            .csrf(ServerHttpSecurity.CsrfSpec::disable)
            .authorizeExchange(exchange -> exchange
                .pathMatchers("/eureka/**", "/actuator/**").permitAll()
                .anyExchange().authenticated()
            )
            .oauth2ResourceServer(oauth2 -> oauth2
                .jwt(jwt -> jwt.jwtAuthenticationConverter(grantedAuthoritiesExtractor()))
            );
        return http.build();
    }
}
spring:
  security:
    oauth2:
      resourceserver:
        jwt:
          issuer-uri: http://localhost:8180/realms/demo-realm
Eureka and actuator endpoints stay public (health checks shouldn’t require a token). Everything else needs a valid JWT.
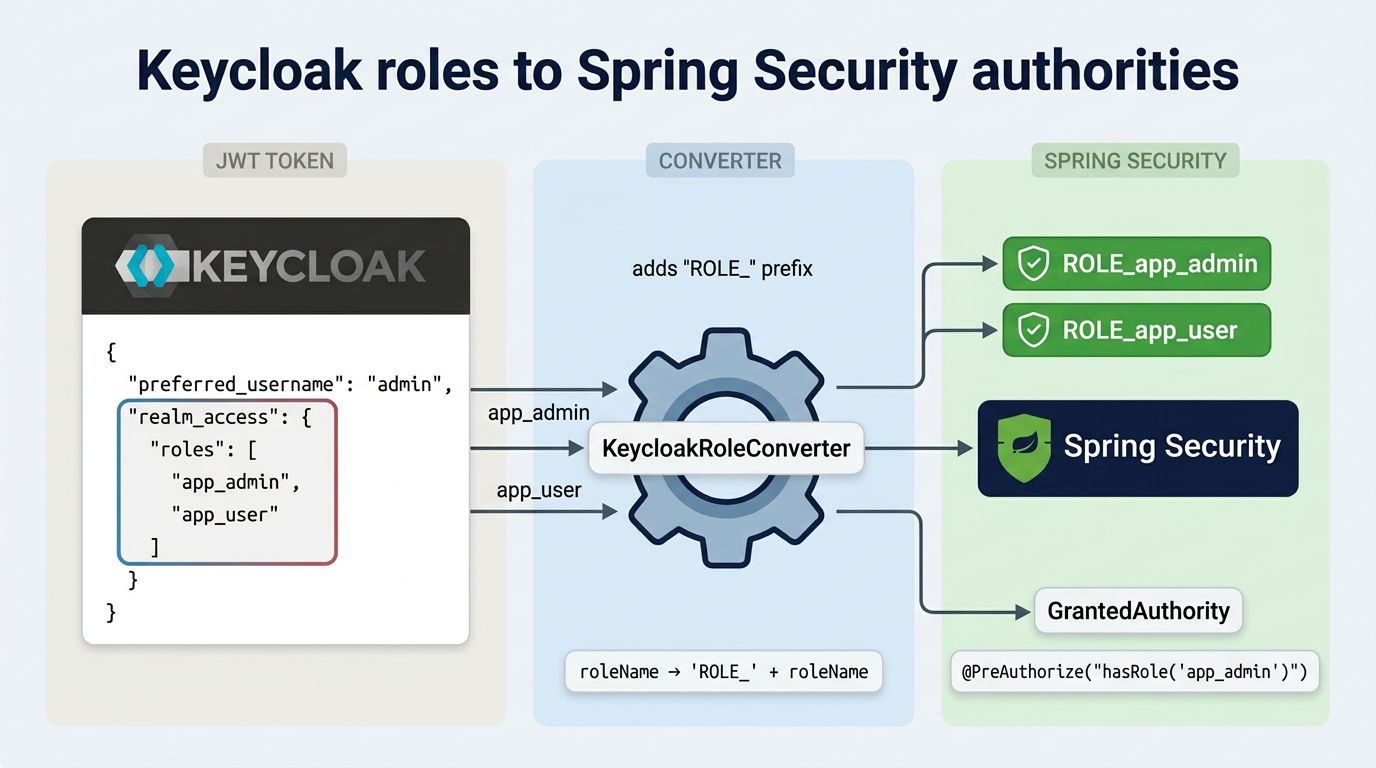
Mapping Keycloak roles to Spring Security
Keycloak and Spring Security don’t speak the same language when it comes to roles. Keycloak nests them under realm_access in the JWT. Spring Security wants a flat list of authorities. This converter does the translation:
public class KeycloakRoleConverter implements Converter<Jwt, Collection<GrantedAuthority>> {

    @Override
    public Collection<GrantedAuthority> convert(Jwt jwt) {
        Map<String, Object> realmAccess =
            (Map<String, Object>) jwt.getClaims().get("realm_access");
        if (realmAccess == null || realmAccess.isEmpty()) return List.of();

        return ((List<String>) realmAccess.get("roles")).stream()
            .map(roleName -> "ROLE_" + roleName)
            .map(SimpleGrantedAuthority::new)
            .collect(Collectors.toList());
    }
}
After this, app_admin in Keycloak becomes ROLE_app_admin in Spring. You can then use @PreAuthorize("hasRole('app_admin')") on any endpoint to control access.
The full picture
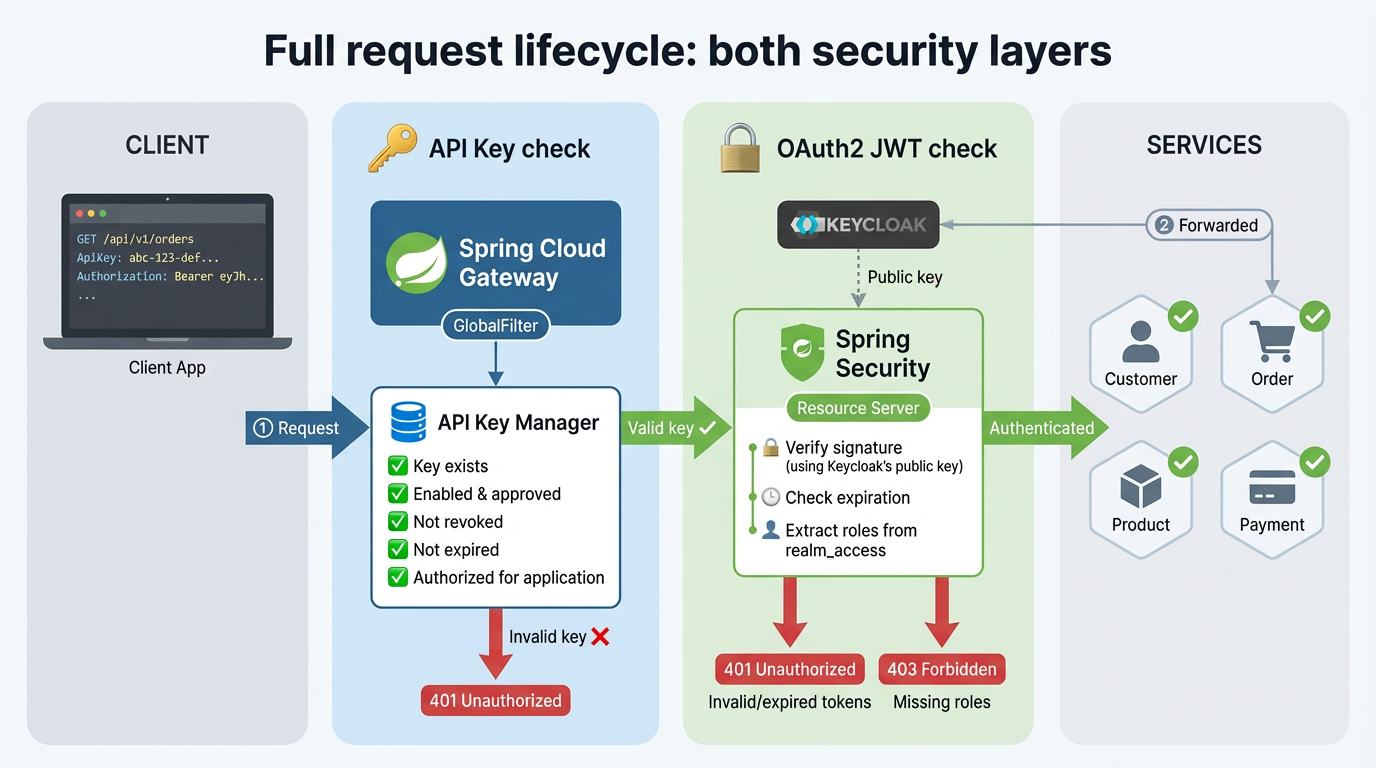
So what actually happens when a request comes in?
-
The gateway checks the API key. The
GlobalFilterreads theApiKeyheader and asks the API Key Manager if this key is allowed to call this service. If not, the request stops here with a401. -
If the key is valid, Spring Security takes over. It reads the
Authorization: Bearer <token>header, verifies the JWT signature, and extracts the user’s roles. Expired or invalid token?401. Valid token but the user lacks the required role?403 Forbidden. -
Only after both checks pass does the request reach the actual service. The service itself doesn’t know or care about security. That’s entirely the gateway’s responsibility.
Resources
- Full guide: miliariadnane.gitbook.io/demo-microservices
- GitHub: github.com/miliariadnane/demo-microservices
Next up: Part 05 — Containerization & Deployment: Docker, Kubernetes & Skaffold.